
Drawing is an art that requires consistent practice, attention to detail, and knowledge of many techniques. One technique involves creating hyper-realistic lips. It is a laborious procedure requiring a sharp eye for detail and a thorough understanding of human anatomy. This lesson will walk you through the steps of perfecting the skill of drawing realistic lips, making it simple.
In this tutorial, I will teach you how to draw hyper realistic lips drawing. To be honest, there is no realistic approach that allows you to learn quickly; without practice, you would struggle to draw hyper realistic. You have to practice with patients. If you are a beginner don’t worry you can also learn and apply in your artwork.
hyper realistic lips drawing: step by step
Before getting into the complexities of hyper-realistic sketching, it’s important to understand the fundamental anatomy of the lips. Human lips are made up of various diverse elements, each of which contributes to their unique appearance and function.
Anatomy of the Lips
The lips are separated into two sections: the top and lower lips. The upper lip is made up of three main parts: a central heart-shaped piece called the tubercle, and two sides that slope downward from the tubercle. The philtrum is a groove located above the tubercle and just below the nose.
The lower lip, on the other hand, consists of two bulbous, pillowy forms surrounded by a ridge that extends from one corner of the mouth to another. The mentolabial sulcus is a furrow that runs from the lower lip to the chin. The prominence of these traits varies from person to person, and their appearance is affected by lighting and head position.
Understanding these hyper realistic lips drawing basic structures will help you grasp the concept of lips drawing, making the process of sketching a realistic lip less daunting.

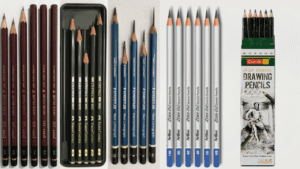
Tools for Realistic Lips Drawing
The right tools can make a big difference in your drawing experience and the outcome. Here are some essential tools for hyper realistic lips drawing:
- Drawing Board: A sturdy yet lightweight drawing board provides a stable base for your artwork.
- Kneaded Eraser: This is used for erasing pencil lines without damaging the paper.
- Drawing Pencils: HB, 2B, and 4B Staedtler Mars Lumograph graphite pencils are ideal for this kind of drawing.
- Drawing Paper: A sheet of Canson Recycled Bristol paper is recommended.
Steps for Drawing Realistic Lips
Now that you’ve got a fundamental understanding of the lip structure and the tools you’ll need, let’s go over how to draw hyper realistic lips drawing.
Step 1: Creating the Basic Outline
The first step to drawing hyper-realistic lips is to establish the basic proportions and angles. I guess a proportion and then evaluate my accuracy using some form of measurement (some of which I discuss below).

This is an excellent approach to hone your eye so that you can eventually rely on it instead of continuously measuring. Draw each line as if you were tracing it over the form’s volume. Noticing the most obvious angle adjustments at this stage will help your drawing appear more realistic.
Even before you add tones, overlapping lines are vital for adding depth and complexity to your design. They identify which figure is in front of another, providing hyper realistic effect to your drawing.
Step 2: Adding first layer
When adding the first layer to your drawing, using a light grade pencil like 2H or HB is recommended. The choice between the two depends on the specifics of your photo reference. The 2H pencil will produce lighter lines, while the HB will offer slightly darker lines. It’s important to carefully observe your photo reference to determine which pencil will best capture the desired level of detail and shading. Starting with a light layer allows for easier adjustments and corrections as you progress with your drawing.
When using a light grade pencil for the first layer of your drawing, it’s crucial to focus on capturing the basic shapes and outlines. This initial layer sets the foundation for the rest of the drawing, so take your time to ensure accuracy. Pay close attention to the varying pressures applied to create light and dark lines, as this will help establish the tonal range in your artwork. Remember, building up the layers gradually will result in a more nuanced and realistic final piece.
Step 3: Blending the first layer
After adding the first layer with a light grade pencil, the next step is to carefully blend this layer. Using a blending tool or even a tissue, gently smooth out the pencil marks to create a more uniform and seamless base for your drawing. This blending process helps to soften any harsh lines and transitions, creating a more realistic and professional look. Pay attention to the direction of the strokes and the pressure applied during blending to maintain the desired texture and tonal variations. Taking the time to blend this initial layer will set the stage for the subsequent layers, leading to a refined and polished final artwork.
While blending the first layer, make sure that the transitions between different regions of the drawing are smooth and without any abrupt changes in texture or tone. Be careful not to over-blend, as texture can add depth and complexity to your artwork. Consider using different blending tools, such as tissue paper, blending stumps, or even cotton swabs, to generate varying effects in different parts of your drawing. Remember that the blending process is critical for establishing a consistent and professional foundation for the remainder of your artistic work.
Step 4: Add more layers
After blending the first layer, add additional layers with varied tones and features to improve the depth and realism of your drawing. This repeated layering method allows for the steady accumulation of values, textures, and complexities, resulting in a more realistic portrayal of the topic. Artists may add complexity and dimension to their artwork by altering the pressure on the pencil, artists can create darker tones and emphasize specific features, adding nuance and dimension to the artwork.

During this stage, light and shadow must be carefully considered, as well as elements like texture and form. Furthermore, adjusting the contrast and constantly reviewing the overall composition ensures that the drawing gradually transforms into a more complicated and realistic representation. Additionally, refining the contrast and continuously assessing the overall composition ensures the gradual transformation of the drawing into a more intricate and realistic depiction. Each subsequent layer adds complexity and depth, bringing the drawing closer to its final form, and allowing for the subtle nuances that breathe life into the artwork.
Step 5: Now add some highlights
After adding more layers, the next critical step is to refine the details and textures of the lips. This requires you to pay great attention to details like highlights, shadows, and detailed textures in order to bring out the lips’ full depth and realism. Highlighting the areas that require highlights, this step takes your hyper realistic lips drawing to the next level.

Here you can see the white area part looks hyper realistic and detailed. This is the technique you can apply in the entire area to look more detailed and look realistic.
Step 6: Refine the darker areas
Now that you’ve added more layers and detailed the textures, it’s time to focus on refining the darker areas in your drawing. This means paying special attention to the shadows and darker tones to make them look more realistic and three-dimensional. By adjusting and fine-tuning these darker areas, you can create a better sense of depth and contrast in your artwork. Take your time to carefully work on these shadowed areas, as they play a crucial role in bringing out the overall richness and realism of your drawing. Once you’ve refined the darker areas, your drawing will have a more lifelike and captivating appearance, drawing the viewer’s eye to the intricacies of your work.

Final Step : Add Finishing Touches
In this last step, It’s time to add those finishing touches that will truly bring your artwork to life. These finishing touches may include perfecting individual lines, increasing shadows, or adding highlights to emphasize certain characteristics. These tiny additions can take your artwork from decent to great. Take a step back and assess whether any areas could benefit from more attention.Consider making any final adjustments to ensure that your drawing looks polished and complete. After you’ve made these last adjustments, take time to admire your completed work. The final touches increase the overall impact of your artwork by providing depth, clarity, and visual intrigue. (Downnload best reference for any medium)

Winding up
Drawing requires a series of careful actions that result in a finished work of art. Each stage, from the first drawing to the final touches, adds to the overall quality and impact of the artwork. You turned a blank paper into an exciting creation by lovingly putting layers, polishing textures, and adding final touches. Remember that each stroke and detail adds depth and character to your drawing, transforming it into a unique representation of your creativity. Accept the process, and don’t be afraid to explore and make mistakes along the way.
Each sketch you do helps you improve your skills and build your own artistic style. So, be proud of your success, take a step back, and observe the outcome of your hard work and devotion. Whether it’s a basic sketch or a comprehensive masterpiece, each completed drawing demonstrates your originality and dedication to the art form. Continue creating, learning, and enjoying the adventure of artistic expression.
FAQ
Q1. How can I add depth and volume to lips in a realistic drawing?
Use shade to provide the impression of dimension and depth. Pay attention to highlights and shadows to show the hyper realistic form of the lips and improve their realistic appearance.
Q2. How can I capture the natural shape of lips in a realistic drawing?
Start by observing the unique shape of lips,paying particular attention to the curves and proportions. Outline the lips with light, confident strokes, then gradually add features.
Q3. What are some common mistakes to avoid when drawing realistic lips?
Common mistakes include overemphasizing the outline, neglecting the subtle variations in color and texture, and failing to consider the overall facial structure. Regularly referencing real lips and practicing observation can help avoid these errors.


Pingback: Mother's Day Drawing 6 Gifts to Show Your Love