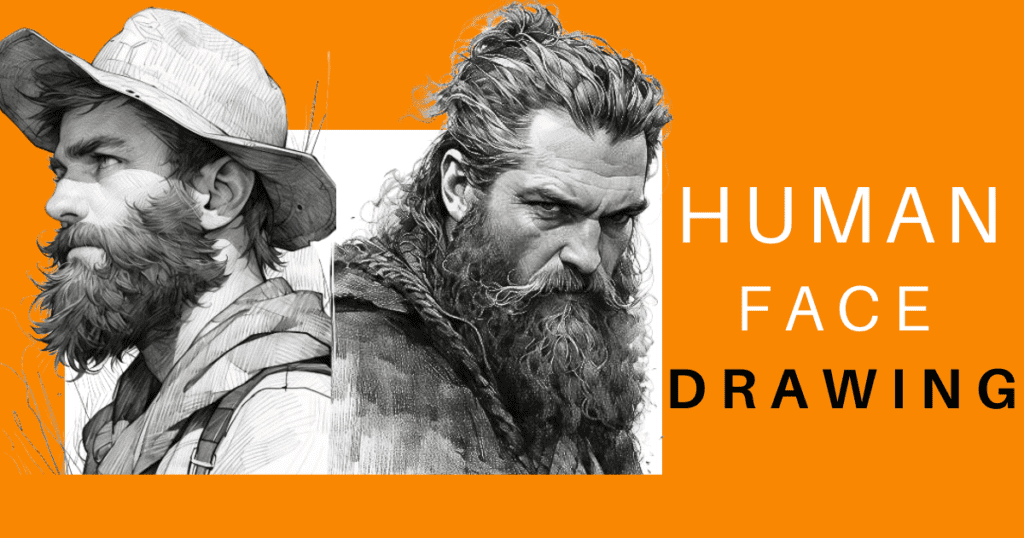
If you are a new artist, one of the first things you will probably do is a pencil human face drawing. It is quite rewarding to master the skill of pencil portraits and learn how to accurately depict a person’s face features. This step-by-step book will help you prepare for pencil portrait drawing by teaching you the methods and insights you’ll need to capture the complexities of the human form and bring your drawings to life.
Key Takeaways
- Understanding facial proportions is important; using grids and center lines can help in properly locating features while maintaining symmetry.
- Depth and shading are key for realism; choose the appropriate tools and use layering and blending techniques to work with light and shadows.
- facial characteristics such as the eyes, nose, and lips must be mastered by close observation and a step-by-step process.
- To add individuality to pictures, capture the subject’s essence, and convey emotion through expressive facial details.
- Improve your skills by practicing consistently, researching facial anatomy, and using techniques such as gesture sketching for more quality.
Understanding Face Proportions
The importance of accurate measurements
When I began to draw a human face, I realized how important it is to measure and comprehend facial proportions. Accurate dimensions are the foundation for a realistic portrait. Without them, even the most detailed drawing can appear off.
Some general tips I’ve picked up are:
- Spending more time measuring rather than drawing
- To highlight features, choose a photo with good contrast.
- Consider the context of the subject’s location
Proportions refer not just to the size of face features, but also to how they are placed relative to one another. Getting this correctly is what gives life to a sketch. It’s also worth noting that, while there are typical proportions, individual differences are what distinguishes each face. For example, children have different proportions than adults. Observing these tiny adjustments is key for capturing a sense of the subject.
Techniques for Acquiring Symmetry and Balance
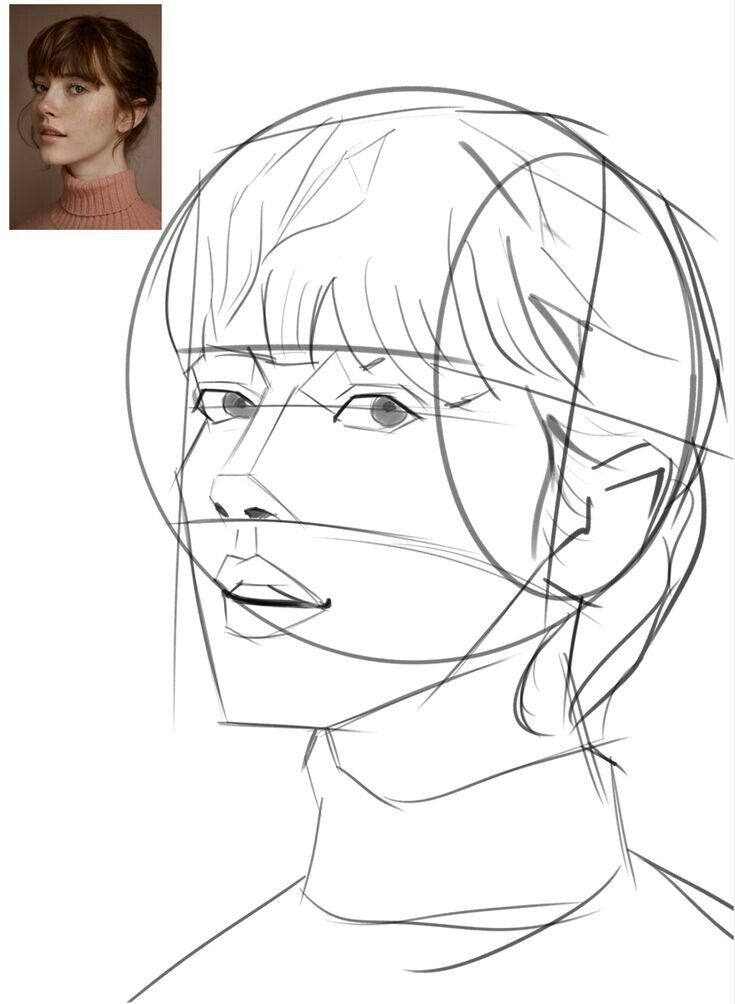
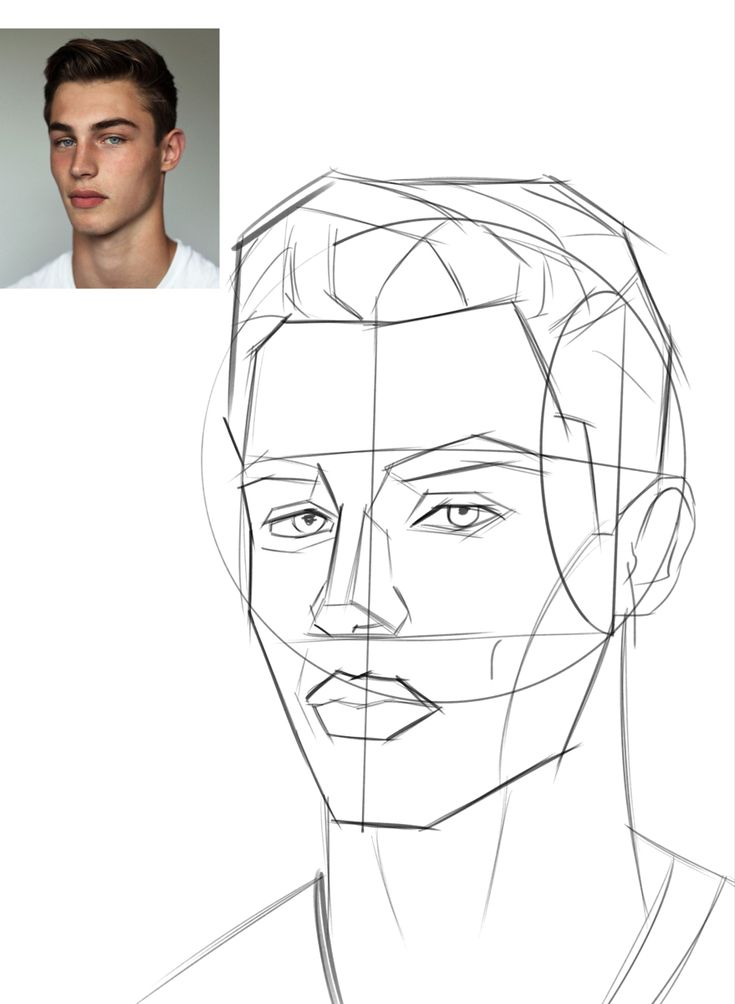
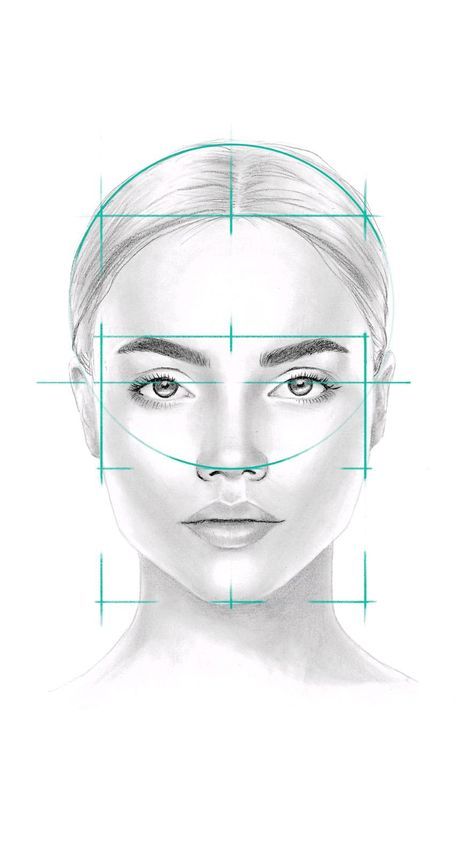
When I draw a face, I start with a vertical line down the center of my paper. This serves as the face’s symmetry axis, a key guide that allows me to maintain balance throughout the drawing process. Then I draw a horizontal line through the center to indicate where the eyes will sit. This line intersection is when I start to ensure that both sides of the face are symmetrical.
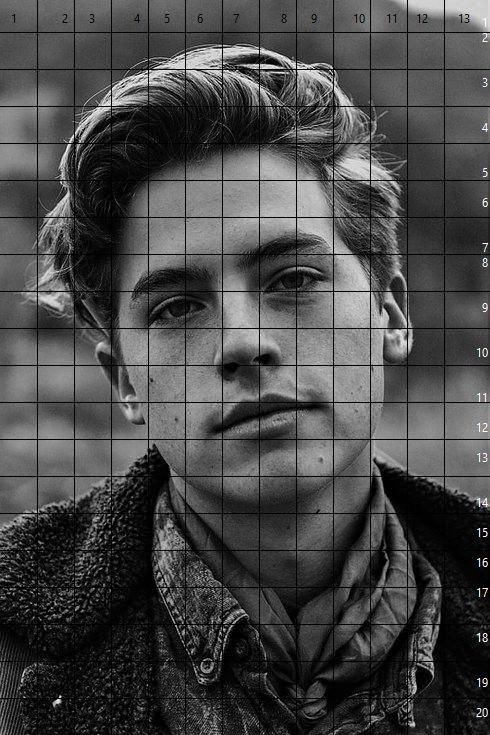
I typically use a grid to help me capture symmetry. I divide the face into three equal portions at the brow, nose, and chin, especially when my subject is at eye level. Here’s a basic explanation of the grid method:
- Top section: forehead to eyebrows.
- Middle section: brows to bottom of the nose.
- Bottom section: from the nose to the chin.
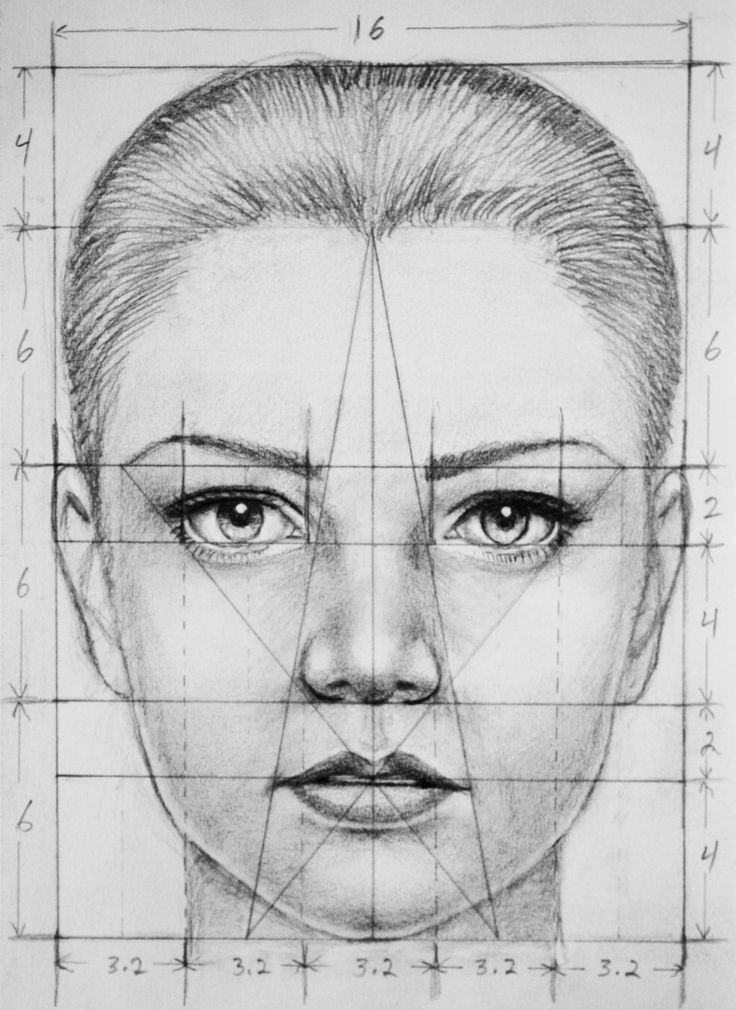
While symmetry is fundamental it is also critical to avoid creating a precisely symmetrical drawing, since this might result in a lack of character and action in your work. Slight differences can bring a portrait to life by highlighting the subject’s special characteristics. I’ve discovered that balance adds richness and depth to my subjects, giving my artwork a sense of reality and vibrancy. It’s not just about the symmetry of the features, but also about the balance of light and dark tones, which can convey depth and perspective. This initial stage is more than just creating the visual tone; it serves as a road map for the intricate features and nuances that will come later.
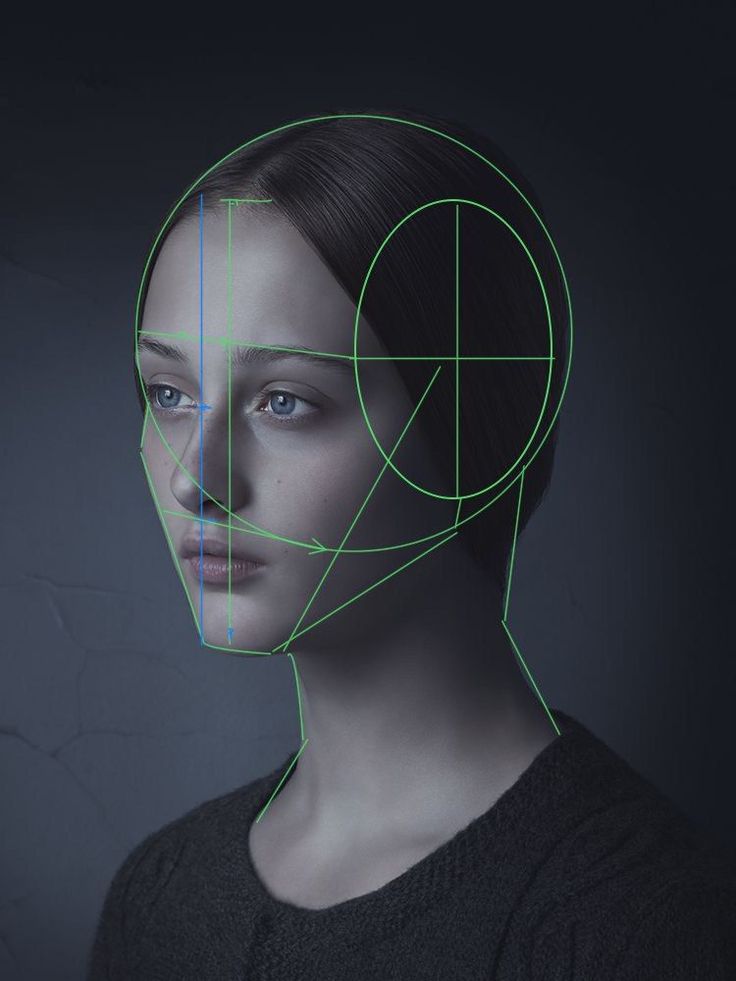
Using Grids and Axis Lines to Find Features
When it comes to locating facial characteristics, I’ve discovered that using grids and axis lines makes all the difference. Drawing a vertical line through the middle of the face divides it into two equal pieces, assuring symmetry from the start. This center line is important because it aligns with the nose and runs from the chin to the top of the forehead.
By outlining the nose’s margins on either side of this vertical axis, I may provide a reference point for other features.
The horizontal axis lines are equally significant. Placing one at eye level allows me to place the eyes correctly.
Sometimes I draw another horizontal line at the bottom of the nose to further split the face and help with feature placement. These lines connect at right angles, forming four quarters on the face and simplifying the complicated work of feature alignment.
Here’s a quick rundown of how I use these lines:
- Vertical axis line: Aligns with the nose, and divides the face symmetrically.
- Horizontal axis line (eye level): Helps locate the eyes.
- Horizontal axis line (nose level): Assists in positioning the nose and mouth.
Remember that these are only construction lines and should be drawn lightly so they can be deleted later. It’s normal to make mistakes; simply erase and redraw until the likeness appears.
Creating Depth and Shading in Pencil Portraits
Choosing the Right Tools and Materials
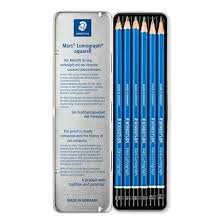
When I begin working on a pencil portrait, I carefully select my equipment. The pencils I use are the foundation of my artwork, and I’ve discovered that different types of pencils can substantially increase my ability to change of my work. To deal with multiple shading approaches and detail work, I always keep a variety of graphite pencils on hand, ranging from soft (8B) to firm (5H).
The paper I use is equally vital as the pencils. Its texture and weight have a significant impact on how the pencil interacts with the surface, influencing the outcome of my work. I prefer a medium-textured paper that is heavy enough to handle repeated erasing and shading without tearing. Here’s a quick rundown of the essential materials I gather before starting a portrait:
- A selection of graphite pencils (8B to 5H)
- Charcoal pencils and sticks
- Graphite pencil and sticks
- High-quality drawing paper
- A good eraser
- A sharpener


While the right materials can set the stage for a great piece of art, it’s the skillful use of these tools that brings the portrait to life.
Layering and Blending Techniques
When I’m learning how to shade a human face, I begin with a light touch with a soft 4B pencil to lay down the first layers. This method allows me to gradually build up the tones, guaranteeing that I can change the depth and darkness as needed. It’s similar to painting with pencils; each layer increases the final image’s richness and intricacy.
Blending is essential for generating realistic textures and smooth transitions between the various tones on the face. I frequently use blending stumps or tortillons to mix the pencil strokes perfectly. Sometimes I’ll use my fingertips to smooth an edge or blend a particularly difficult spot.
The key is to blend in a way that enhances the natural contours of the face without overworking the paper. Here’s a simple list of shading techniques that can add dimension to your drawings:
- Hatching
- Cross-hatching
- Stippling
- Scumbling
- Contour shading
Experimenting with these techniques will not only improve your skill but also give you a better understanding of how light interacts with the form. As I continue to refine the portrait, I pay close attention to the darks and lights, defining them more clearly to bring out the features. It’s a delicate balance, but when done correctly, the face begins to come alive on the paper.
Working with Light and Shadow to Create Realism
When I teach human shade drawing to beginners, I always stress the value of understanding light and shadow. The interplay of these two parts gives life to a portrait. After selecting my light source, I squint at the reference image to see the tiny tonal differences. This approach breaks down complex patterns into more manageable light and dark parts, making them easier to put into paper.
To achieve a realistic light source effect, study how light interacts with objects in real life, practice rendering light and shadow, and pay close attention to the direction and intensity of light in your drawings.
Here’s a quick rundown of steps to follow:
- Identify the lightest and darkest areas in your reference.
- Begin with light shading and gradually build up to the darker tones.
- Use shading techniques to depict the form and curvature of the face.
- Pay special attention to the direction and intensity of the light source.
Remember, the goal is to achieve a balance that gives the illusion of depth and volume, making your portrait come to life.
Mastering Facial Features
An easy-to-follow drawing with realistic eyes
When I began to learn human face drawing, I quickly recognized that the eyes are a critical component to nailing a genuine human face drawing. They say the eyes are the windows to the soul, and capturing its essence is critical. Here’s how I tackle it:
- Start with the basic almond shape for the eye, ensuring the proportions match the rest of the face.
- Draw the iris and pupil, focusing on their placement within the eye.
- Sketch the eyelids, considering how they frame the eye.
- Add the details such as the highlights and eyelashes, paying attention to the unique characteristics of your subject’s eyes.
- Use shading to give depth to the eye, creating a sense of realism.
- Observe and replicate the way light reflects in the eyes, which adds life to your drawing.
- Practice this process, as each eye you draw will have its own distinct features and expressions.
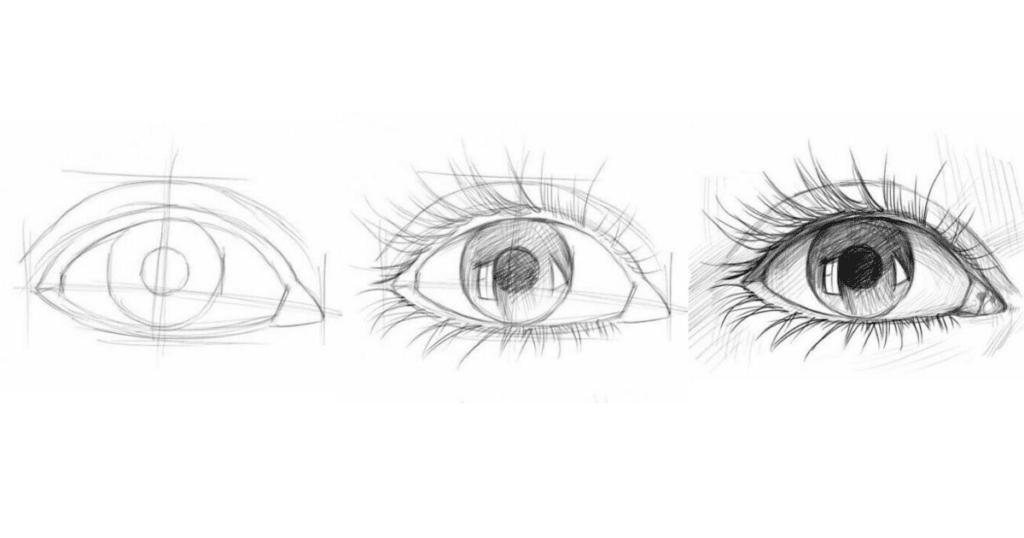
Drawing eyes becomes a little easier and more of a structured activity when broken down into reasonable parts, in my experience. Each phase builds on the previous one, resulting in a more lifelike outcome. Remember, the key to mastering any aspect of drawing, especially something as intricate as the eyes, is practice. With each attempt, you’ll notice improvements and beginners that make your portraits stand out.
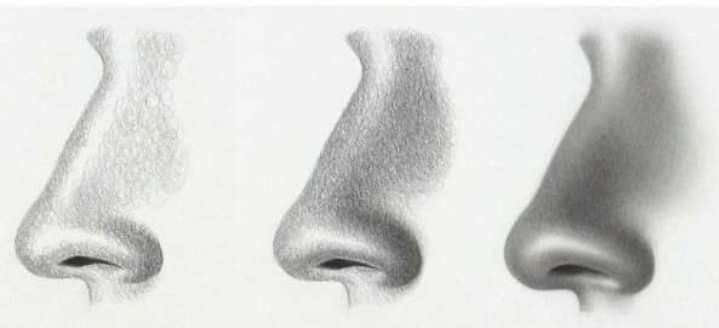
Building the Nose With Pencil Strokes
When I begin to sculpt a nose with pencil strokes, I first lightly draw the basic framework, taking into account the length, width, and curvature. It’s critical to precisely capture the form and location of the nose on the face, as it contributes greatly to the similarities of the person I’m sketching.
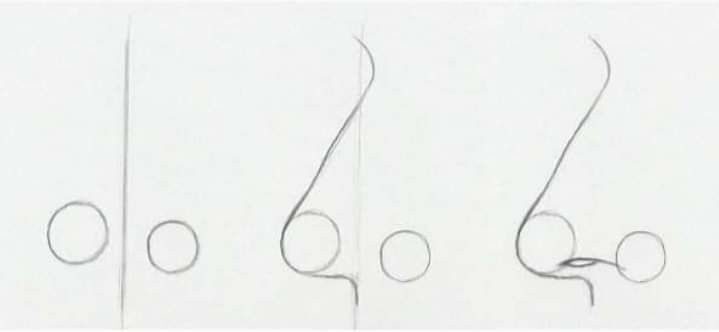
- To get the basic nose shape right, I draw a circle with two straight vertical lines on top. Then, I add two claw shapes on either side of the circle to form the nostrils.
- Shading is key in sculpting the nose. I use tones to create depth, paying attention to the shadows cast on either side of the bridge.
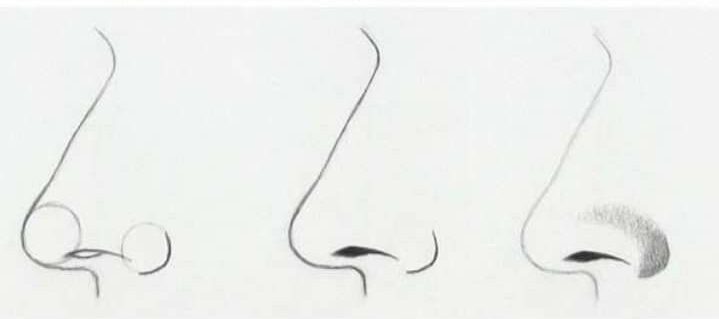
The nose doesn’t have defining edges; it’s the shading that gives it form. I look at the shadows it casts based on its dimension and direction and render the tones accurately. Each nose is unique, and I keep in mind that they come in various shapes and sizes. This means adjusting my approach to suit the individual I’m drawing. The right tools, like an H pencil for outlining and a 4B pencil for shading, are essential in this process.
Creating Lifelike Lip and Mouth Expressions
When I set out to create lifelike lips and mouth expressions in my sketches, I begin by observing the subject’s lips’ specific features. Their shape, fullness, and interaction with other face features are all important. I begin by sketching the outline, paying special attention to the curves and proportions, before moving on to details such as the cupid’s bow and the corners of the lips.
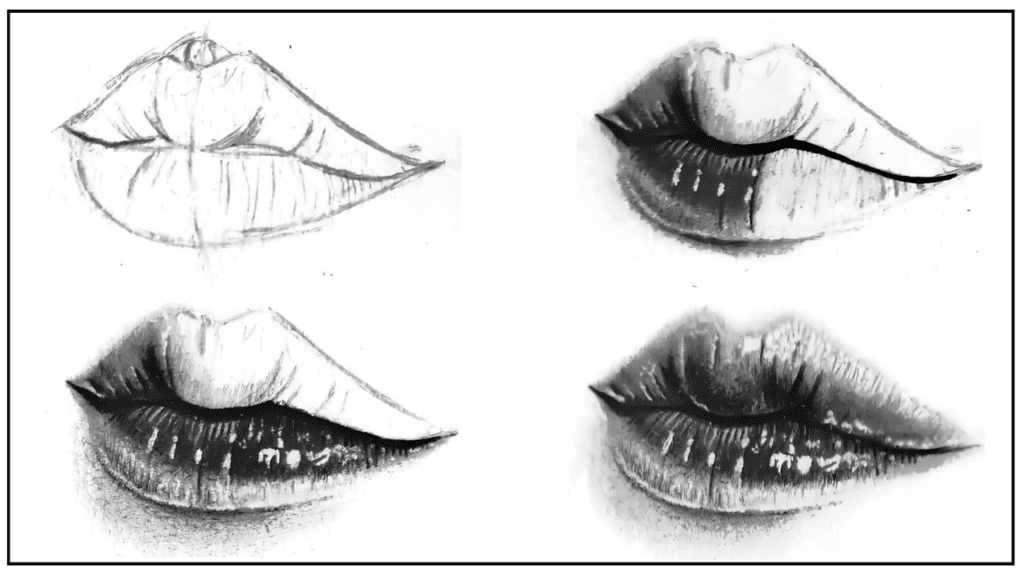
To form the full lips, I use three round or oval-shaped guides, two at the bottom and one at the top. This allows me to curve the lips around these circles while also catering to the model’s individual mouth shape. Using a 2B pencil to draw vertical lines across the length of the lips adds the necessary realism, and smile crinkles are a wonderful touch.
To design realistic lips, you must first understand how they interact with face expressions. The corners of the lips, for example, can convey a great deal about a person’s emotional condition.
Here’s a quick guide to help you measure and draw lips accurately:
- Measure the lips from your reference to get accurate proportions.
- Observe the projections of the lip to understand the tones.
- Use circles and ovals to outline the basic shape.
- Add soft, gestural lines to represent the vertical texture of the lips.
By following these steps, you can begin to capture the subtleties that bring a portrait to life. It’s these small details that can convey a wide range of emotions and add character to your work.
Refining Your Skills: Tips and Tricks for Human Face Drawing
Gesture Drawing and Quick Sketch Techniques
I’ve found that incorporating gesture drawing into my routine has been a game-changer for improving my speed and fluidity. It’s all about capturing the essence of the pose rather than getting bogged down in the details. Here’s a quick rundown of how I approach it:
- Start with quick, loose sketches to grasp the overall form and movement.
- Focus on the line of action and how the body’s weight is distributed.
- Use simple shapes to represent the major parts of the face.
- Refine the sketch gradually, adding more detail only after the gesture is in place.
This method not only speeds up the drawing process but also helps in maintaining the dynamism and life in your portraits.
Another aspect I pay attention to is the anatomy of the face. A solid understanding of the skull, muscles, and how the skin drapes over them is crucial. It’s not just about the surface; it’s about what lies beneath and how it affects the appearance. I often refer to a list I’ve compiled over time:
- Study the basic structure of the skull.
- Observe how muscles influence facial expressions.
- Practice drawing different facial features in isolation.
- Combine these studies to create a cohesive and expressive portrait.
By alternating between these exercises, I’ve noticed a significant improvement in my ability to convey emotion and personality in my drawings. It’s a reminder that sometimes, the secrets to drawing faces lie in the swift capture of a moment, as suggested by the snippet ‘10 Gesture Drawing Secrets Experts Won’t Tell You‘. As I continue to practice, I often look to resources like ‘8 Ways To Practice Drawing Faces‘ for fresh ideas and techniques.
Studying Facial Anatomy for Better Accuracy
I’ve found that a deep dive into facial anatomy significantly improves the accuracy of my portraits. It’s about more than just capturing a likeness; it’s about understanding the structure beneath the skin that shapes each feature. The importance of studying anatomy and learning proportions cannot be overstated when it comes to creating realistic art.
Here’s a simple list to get started with facial anatomy:
- Identify the basic skull structure and note how it supports facial features.
- Observe the muscle groups and how they affect expressions.
- Study the proportions of the face, such as the distance between the eyes and the size of the ears in relation to the head.
By internalizing these anatomical details, I can translate them onto paper, making my drawings more than just a flat representation; they become a true reflection of the human form.
Wrapping up With the Result
Practicing the technique of sketching human faces is a satisfying activity that combines knowledge of the material and creative thinking. Throughout this book, we’ve covered the core techniques and concepts required to capture the essence of the human face. Each step, from understanding facial anatomy to honing your shading and texturing abilities, serves as a foundation for creating lifelike and emotive portraits. Remember that the route to mastery is a continual method of learning and practice. Accept the challenges, enjoy your progress, and let each sketch take you closer to the actual artistry of pencil drawing.


Pingback: Hyper Realistic Hair Drawing: Exploring Style and Approaches
Hi there,
My name is Mike from Monkey Digital,
Allow me to present to you a lifetime revenue opportunity of 35%
That’s right, you can earn 35% of every order made by your affiliate for life.
Simply register with us, generate your affiliate links, and incorporate them on your website, and you are done. It takes only 5 minutes to set up everything, and the payouts are sent each month.
Click here to enroll with us today:
https://www.monkeydigital.org/affiliate-dashboard/
Think about it,
Every website owner requires the use of search engine optimization (SEO) for their website. This endeavor holds significant potential for both parties involved.
Thanks and regards
Mike Walter
Monkey Digital
tBOuaoEmpJx
I do trust all the ideas youve presented in your post They are really convincing and will definitely work Nonetheless the posts are too short for newbies May just you please lengthen them a bit from next time Thank you for the post
I simply could not go away your web site prior to suggesting that I really enjoyed the standard info a person supply on your guests Is going to be back incessantly to investigate crosscheck new posts
I loved as much as youll receive carried out right here The sketch is tasteful your authored material stylish nonetheless you command get bought an nervousness over that you wish be delivering the following unwell unquestionably come more formerly again since exactly the same nearly a lot often inside case you shield this hike